


............
I want to say this, if you are working along, the method for the last page would be usable with a few changes for another page in your book.
Paint your gessoed page with any color paint that you like. when dry, using any white glue(I like elmers) tear or cut pieces of paper and glue them down, leaving spaces between and no air bubbles. When this is dry, put a nice coat of elmers over it and allow to dry thoroughly. When dry another coat of gel medium ( if you have it), if you don't, another coat of glue and dry thoroughly. My squares are from a hancock fabric catalog, there is a lot of colors and textures, but you can cut these from anywhere that is not real glossy. Scrapbook paper.
Next step: dry bush a coat of black over surface, allow to dry and wipe off with a damp cloth lightly. Do the same with white paint. This makes a very interesting background for a lot of images, if you look down in my blog you will see different pieces done with this method,sand it good with a light grade of sandpaper. I will continue later.
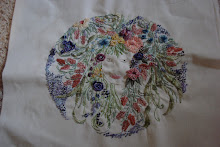
Here is the page almost done, top picture, after you sand and wipe residue, use your distress ink pad and rub it all over the background. Very nice look. My nest step was ripping a paper that matched and glueing so there is an opening. then the pocket sewn with a zig zag and glued so there will be a pocker, the flowers are cut from wallpaper and the one picture is framed with a frame from K and CO.
One is mounted on corrugated cardboard and another on a scrap, I piece of distressed and embossed copper is slid in the torn pocket, heart cut from words and cherish is mounted on sandpaper. Will add some details tomorrow but here is a page done on the paper piecing background. The top picture is the finished page with lace and brass charms added. Starting another page today.


No comments:
Post a Comment