


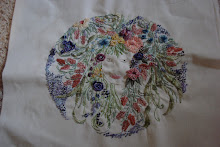
The first thing you are going to do is paint your matchbox inside and out with paint to match your image,allow to dry.A piece of coordinating paper in bottom of box and wrap the outside, you are going to have to score to get the proper fold, dry. When you print your image , print 2 about 7 inches high. Cut off head about 3/4 of the size of the inside of the matchbox.
This would be a good time to decorate your girls' hair, jewels,necklace etc.
Cut 2 rest of bodies.
Cut off 2 the length of the matchbox.
The top is layered with pop dots to give it dimension. Glue to top of matchbox, add flowers ,lace . Pop dot the two skirts together and add a piece of cardstock to glue on back. Add lace, ribbon,Add a hanger on the back.I added wings and blue stickles to decorate them
The other is done almost the same way but the opening in the box is in the stomach area, which I used as a nest with eggs,moss and a bird. She has wings and a birdhouse by her shoulder.
The images are here for you to use(if you choose.
If this is not clear enough ,just ask and I will help in any way I can. Happy Mother's DayHave a great day!!


5 comments:
thanks so much Betty!!!!
I've been waiting!!!..you were very quick getting this tutorial posted!!!! :)
Thank you for the tutorial - looks like fun!
Thanks much for sharing the cute images. I would love to try this,very sweet.
Happy Mother's Day, Betty! Thank you for the tutorial and the sweet images!
Hi Betty, Thank you so much for this wonderful tutorial! I'll be sure to create one for myself. Thank you again, this was very sweet of you to do! Also, thank you so much for the precious and adorable images. Very much appreciated!
Hope you have a wonderful rest of your evening.
Hugs and many blessings...
Bobbi Ann
Post a Comment